

Revit Configuration Portal
What is the REVIT Configuration Portal?
The Carrier Revit configuration portal allows you to preconfigure the family files based on the specifications of the job.
The configurator, designed with commercial building professionals in mind, provides the ability to completely preconfigure Carrier HVAC units based on key criteria for a project, such as capacity, size, factory-installed options, and voltage. Each preconfigured model is then available for download for Autodesk® Revit, the leading architectural design software, along with other key file formats and documentation to assist in the design process. By preconfiguring the file, the user can save time normally needed to configure the unit within the Revit software. The full model number of the unit is generated with the Revit, making sure the correct configuration is used in the project.
The configurator is available for Carrier outdoor packaged products, including electric, gas, and heat pump systems, as well as Carrier light commercial split system units. The tool allows for uniquely fast and easy configuration on the go, but Carrier representatives are available to provide assistance if needed.
How to Use the Revit Configurator
1. Create an Account
Clicking on a unit in the configurator will allow you to log in or create an account if you don't have one. This account allows you to save all your projects for later use. This account is not associated with HVACpartners. It is a separate account used to store your projects.
2. Start a Configuration
Once you have selected a unit, the configuration screen will open. Use the drop downs to select the correct configuration of the unit. Once they have been selected, the unit model number will be displayed. This will allow you to check to see if it matches the unit on a job or specification. If you are unsure or having trouble, click on the Help Me Decide button. This will allow you to send a message to your local Carrier sales office, based on the location from your profile.
Click on the Create Revit File button to start the creation process. You can choose to name the project if desired. Please note your local Carrier sales office will be notified and you may be contacted.
3. My Projects Page
All created projects are stored on the My Projects page. It takes about a minute before the file is ready. You will know it's ready when the R icon turns blue. Once the icon is blue, you can download and use the preconfigured file.
4. Support
If you have any issues with the configurator loading, try clearing cookies on your browser. For support, contact [email protected].
Frequently Asked Questions
I Don't See the Unit I Need in the Configurator, Where Is It?
We are currently only providing the configuration ability for small and medium rooftops and split systems. Contact your local Carrier sales office for other pre-configured Revit files. family files are also provided on this website for your use.
How Do I Load My Revit Family File into a Project?
Carrier Revit families, are authored in Revit version 2016. Revit software is not backwards compatible, so the families cannot be used in previous software versions (2015 and below) unless exported to other CAD software. The families can be used in all software versions above 2016.
Carrier Revit families come with text files named similarly to the .rfa Revit file, known as type catalogs, that house all of the available tonnage options. When a RTU is loaded into a Revit project, users will be given that list of tonnage options to choose from.

Users may select as many of the options as they want to bring in. If users want to bring in additional tonnage options after the RTU has already been loaded, they may find the product in the Project Browser, right click on the product, and click “Reload”.
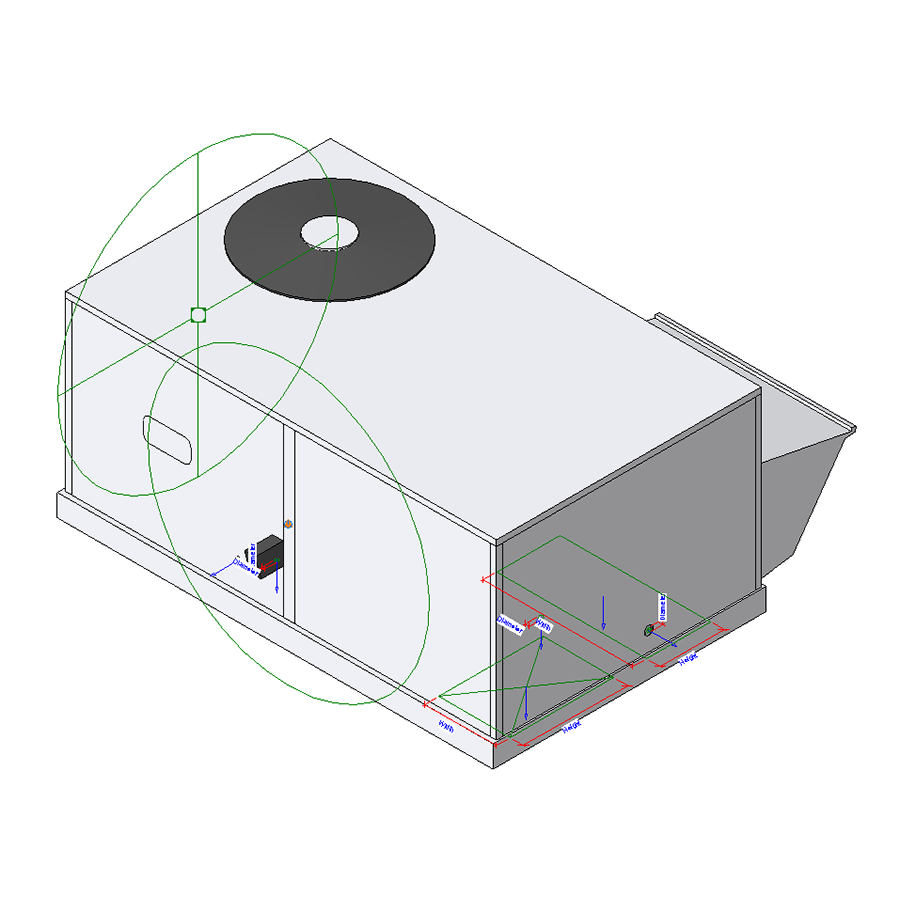
Certain RTUs have specific types for Vertical and Horizontal duct connections. For the RTUs that do not have specific types for Vertical and Horizontal duct connections, there are simple Yes/No checkbox options for deciding which direction the airflow is.
When in a project, clicking on the RTU will display a Properties window that shows users instance parameters that can be unique between identical tonnage sizes. These units can have Supply Air Vertical or Horizontal and Return Air Vertical or Horizontal. The connections automatically rotate and resize themselves to the appropriate dimensions and locations.
Clearance dimensions can be set to the recommended requirements for their project needs. Users are guided to contact Carrier to consult on specifics.
Clicking on ‘Use Thru Base Connections’ will visually turn on the locations, in plan view and 3D views, for all required utilities.

The Economizer hood can be turned on and off with the checkbox under the Graphics tab.
Clearances can be turned on and off with the checkbox under the Graphics tab.
The Curb accessory can be turned on and off with the checkboxes under the Construction tab. Both sizes, 14” and 24”, are available.
Please note, Carrier is here for you if you need help. You can always click on the Find an Expert button at the top of the screen and your local Carrier expert can help by creating the REVIT file for you. If you don't see the unit you need, your Carrier expert may be able to provide it for you.